Installation of pxe boot, Linux and Windows
Intro
I wanted to make it a bit easier to install a new machine with a OS. But sometimes I want a debian, a Ubuntu or what ever I would feel like to play around with.
But what about windows that one too.
So I poked a round with google to find out, what and how to do this in the most effective way. To my supprise it turned out to be easiere than I imagine.
DHCP Setup
On my own network I use dnsmasq for DNS and DHCP services so an edition to my configuration was needed.
Had to add this line:
dhcp-boot=pxelinux.0,kirk,192.168.20.12
This configuration is need because im running my dhcp and pxe server on to different nodes
If I had chosen not to then in the static interface configuration on my pxe server/dhcp server the options.
filename “pxelinux.0”;
next-server 192.168.1.50;
When booting from the network the bootloader looks for a tftp server at the location specified in the dhcp, either from dnsmasq or a dhcp-server installed locally.
And on the location of the pxelinux.0 file. The pxelinux.0 loads the configuration from the pxelinu.cfg/default. This file is shown later
Installation of the pxe server
- tftpd-hpa for the tftp server
- syslinux for kernel and menu options
apt-get install tftp-hpa syslinux
The default tftp folder is /srv/tftp but I wanted to change that into /var/lib/tftpboot. This is widely use when creating a pxe boot server.
mkdir –p /var/lib/tftpboot
-p makes sure to create the path not just the end folder
Set /var/lib/tftpboot as root folder for tftp connections by editing /etc/default/tftpd-hpa with the following configuration.

Notice that the TFTP_DIRECTORY has been commented out, this is because that when setting a symbolic link to the /var/lib/tftpboot folder it thinks that there are more than one directory and tftp-hpa fails restart and gives an error in the syslog with “To many Directories”
From Syslinux copy the follow file from /var/lib/syslinux to the tftpboot folder
cp /var/lib/syslinux/pxelinux.0 /var/lib/tftpboot/
Restart the service and check syslog for possible errors from the tftp service
Service tftp-hpa restart
If no errors from the service is reported then it is good to go.
Because tftp uses UDP it ca not be checked by netstat –ant about listen port. So the TFTP_ADDRESS=”0.0.0.0:69” show that it will use the standard port for tftp traffic and will listen for all IP´s.
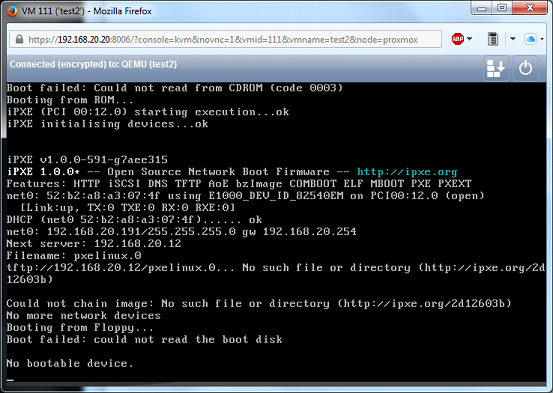
Start up a test server and set it to boot on the network
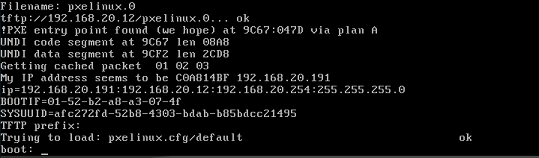
The picture shows that VM gets tries to boot from HDD and CD-rom first but fails. Then it starts the pxe service, gets an IP, prints out is network settings, gets a options on what the IP are on the next server, the PXE Server. Then it looks for a file called PXElinux.0. This binary file runs the tftp server configurations. The boot options is located in pxelinux.cfg/default and pxelinux.0 looks for this configuration and reads the file.
If not *.txt file is made for it to display it will not display anything else than BOOT like the picture below.
Creating Boot menu
Nevertheless, how to know what to write to start a boot? In addition, what systems do I have available?
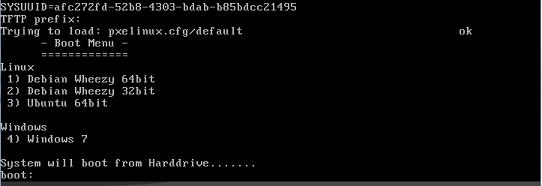
That can be done by making a boot.txt file, writen in plain text what to shown as menu.
A very simple menu could be
– Boot Menu –
=============
Linux
1) Debian Wheezy 64bit
2) Debian Wheezy 32bit
3) Ubuntu 64bit
- Windows 4) Windows 7
System will boot from Harddrive…….
In practices it would look like this
But this is quite boring to look at and and why not prettify it abit. Syslinux contains from menu configuration.
Two files for creation of menu consist in the syslinux directory. It default directory is /usr/lib/syslinux. Copy the desired menu file to the /var/lib/tftpboot folder.
In this case the menu.c32 menu is being used.
cp /use/lib/syslinux/menu.c32 /var/lib/tftpboot
This file has to be in the same folder as the pxelinux.0 file, so the tftp root folder.
When copied the file the configuration file /var/lib/tftpboot/pxelinux.cfg/default has to be changed to show the new menu. To use the menu.c32 as UI add “UI menu.c32” to the configurations file.
UI menu.c32
DISPLAY boot.txt
DEFAULT HDDPROMPT 1
TIMEOUT 50LABEL 1
menu label ^1) Install Debian 64bit
kernel debian/wheezy/amd64/linux
append vga=normal initrd=debian/wheezy/amd64/initrd.gz —
LABEL 2
menu label ^2) Install Debian 32bit
kernel debian/wheezy/i386/linux
append vga=normal initrd=../debian/wheezy/i386/initrd.gz —
LABEL 3
menu label ^3) Install Ubuntu 64bit
kernel /ubuntu/amd64/linux
append vga=normal initrd=ubuntu/amd64/initrd.gz —
label 4
menu label ^4) Install Windows 7 x32/x64
KERNEL memdisk
INITRD windows/winpe_x86.iso
APPEND iso rawLABEL 5
MENU LABEL ^Q) Continue Bootup
kernel chain.c32
append hd0
Okay what is all of this? And what does it all mean?
- UI sets the user interface file and in this case menu.c32 that was copied to the root folder of the tftp server.
- DISPLAY is not used here now with the use of menu.c32 file. So that one could be removed from the configuration.
- TIMEOUT is the delay time in 1/10 of a second so the value 50 is equal with 5 second delay.
- LABEL This is what it will match with the input from user. Eg. If 3 is entered and pressed enter it will go though the Labels and execute the Label that matches.
- menu label ^3) Install Ubuntu 64bit – Menu label is what is presented for the user so here is will show ”3) Install Ubuntu 64 bit”
- KERNEL /ubuntu/amd64/linux The kernel that is use with the specific system. These files are downloaded from the Ubuntu public ftp server
- APPEND vga=normal initrd=ubuntu/amd64/initrd.gz — The bootload for the specific OS
Next is a Windows netboot install. It uses some of the same features but need a pre-prepare winpe_x86 file. This file is created on a windows machine with MS Windows AIK installed
label 4
menu label ^4) Install Windows 7 x32/x64
KERNEL memdisk
INITRD windows/winpe_x86.iso
APPEND iso raw – To use a iso menu in the boot up. It will load and act like if a normal cd is in the tray

Preparing the boot images
Now there are a menu but nothing behind it to boot. First the Debian and Ubuntu is being added. This is done the the net-boot install files from the official sites. So it will boot and while it installs it will download the newest version of a distribution. But this requirer a Internet connection and might now be a good idea when installing multiple machines. This can be solved by using a proxy with the installation to be used as a mirror. Instead of the normal ones based one location (country).
From tftpboot root
mkdir debian/wheezy/amd64
cd mkdir debian/wheezy/amd64
wget ftp://ftp.dk.debian.org/debian/dists/wheezy/main/installer-amd64/current/images/netboot/debian-installer/amd64/linux
wget ftp://ftp.dk.debian.org/debian/dists/wheezy/main/installer-amd64/current/images/netboot/debian-installer/amd64/initrd.gz
This is the kernel file and the netboot install *.gz for 64 bit
For 32 bit
From tftpboot root
mkdir debian/wheezy/i386
cd mkdir debian/wheezy/i386
wget ftp://ftp.dk.debian.org/debian/dists/wheezy/main/installer-i386/current/images/netboot/debian-installer/i386/linux
wget ftp://ftp.dk.debian.org/debian/dists/wheezy/main/installer-i386/current/images/netboot/debian-installer/i386/initrd.gz
Ubuntu 64bit
mkdir ubuntu/vivid/amd64
cd ubuntu/vivid/amd64
wget http://ftp.ubuntu.com/ubuntu/dists/vivid/main/installer-amd64/current/images/netboot/ubuntu-installer/amd64/linux
wget http://ftp.ubuntu.com/ubuntu/dists/vivid/main/installer-amd64/current/images/netboot/ubuntu-installer/amd64/initrd.gz
Windows Boot WinPE
The Windows is more special and need a bit more work. Download and install Microsft Windows AIK on a windows 7 Machine.
It can be downloaded here
http://www.microsoft.com/en-us/download/details.aspx?id=5753
After the program is install execute the “Deployment Tools Command Prompt” from the start menu.
A little command line windows pops up and now the Windows 7 Preinstallation Environment can be build. From the Deployment tool do
- copype x86 C:\winPE_x86
- copy “C:\Program Files\Windows AIK\Tools\PETools\x86\winpe.wim” C:\winpe_x86\ISO\Sources\Boot.wim
- copy “C:\Program Files\Windows AIK\Tools\x86\Imagex.exe” C:\winpe_x86\ISO\
- oscdimg -n -bC:\winpe_x86\etfsboot.com C:\winpe_x86\ISO C:\winpe_x86\winpe_x86.iso
This will build a winPE_x86.iso file.
One the PXE server create a new folder in the tftpboot root for the windows boot kernel
mkdir -p /var/lib/tftpboot/windows/windows7
Copy/move the winPE_x86 to the folder either by scp or smb//share (that we create in a moment for windows CD files).
First login to PXE Server with sudo privileges and setup a Samba share, where Windows 7 DVD installation sources will be located.
Install Samba and winbind
apt-get install samba samba-common samba-winbind
Create a backup samba main configuration file and create a new configuration file with your favorite text editor.
mv /etc/samba/smb.conf /etc/samba/smb.conf.backup
nano /etc/samba/smb.conf
Add the following configurations to smb.conf file as below
[global]
workgroup = PXE
server string = Samba Server Version %v
log file = /var/log/samba/log.%m
max log size = 50
idmap config * : backend = tdb
cups options = raw
netbios name = pxe
map to guest = bad user
dns proxy = no
public = yes
## For multiple installations the same time – not lock kernel
kernel oplocks = no
nt acl support = no
security = user
guest account = nobody[install]
comment = Windows 7 Image
path =/share/windows
read only = no
browseable = yes
public = yes
printable = no
guest ok = yes
oplocks = no
level2 oplocks = no
locking = no
As you can see from this configuration file there is created a shared folder named install which is located under /share/windows system path (on this path will copy Windows 7 DVD installation sources).
Run testparm command in to check and validate the file for eventual errors or misconfiguration.
testparm
Now it is just needed to create the /share/windows directory under root path (the directory defined in samba conf file)
Setup the permissions and user/group settings for access the the share without user/password
chmod -R 0755 /windows
chown -R nobody:nogroup /Share/windows
Copy the windows install files to the location above.
Now boot up and in the boot menu choose to boot win the windows options
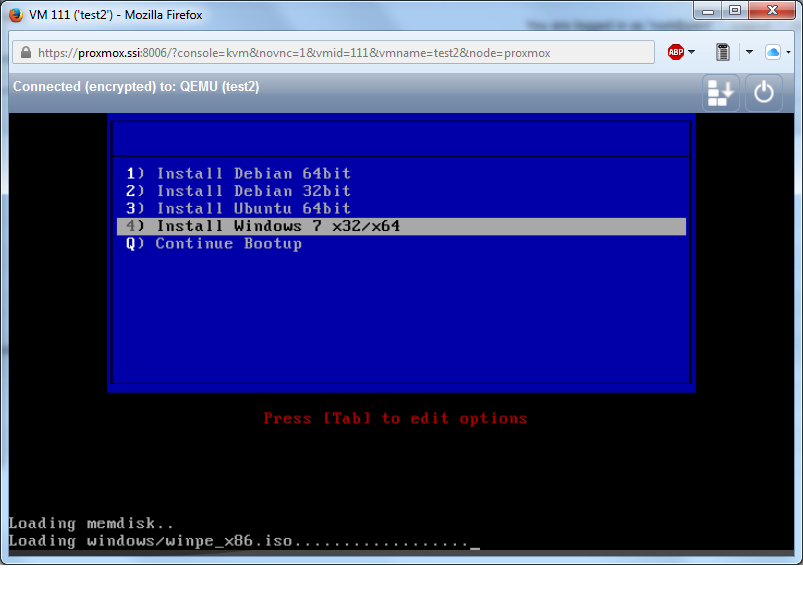 Not it will load the ISO file and act like a CD.
After the windows files has been loaded a command line interface is presented.
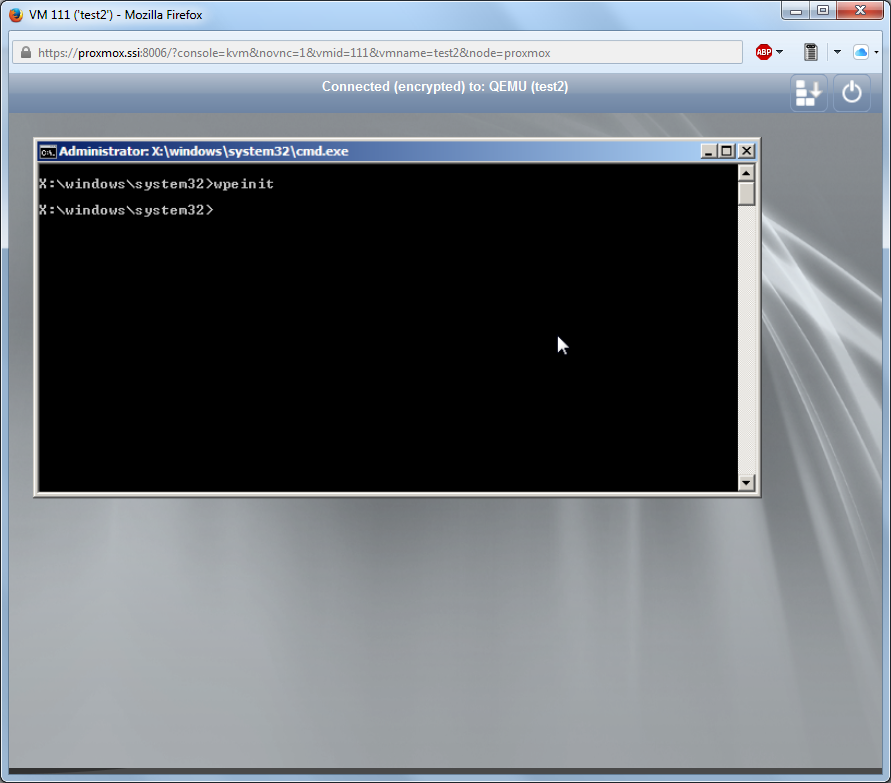
Net use u: \\Samba_share_IP\install\x64
Navigate to U: drev and execute “Setup.exe” for starting the installation process.

Now windows can be install like normal installation with a CD.
The next thing I will try with this pxe booting is to make a “unattended.xml” file to use for default installation of multiple pc´s. Then life will be much more easy.
Appreciation to my father who stated to me on the topic of this website, this weblog is in fact awesome.